Tuesday, June 23, 2009

720p

Was looking for some trailers in 720p for some video tests. I thought 720p is defined to be 1280 x 720 pixels, but on http://www.digital-digest.com/movies/movie_index.php I found files marked as '720p' in all kind of different resolutions:

1280 x 528
1280 x 532
1280 x 544 (seen a lot!)
1280 x 688
1280 x 692
1280 x 704
1280 x 720

...and for 1080p I found:

1920 x 796
1920 x 800
1920 x 816
1920 x 1080

Very confusing to name it 720p and 1080p, as the only common thing always seems to be the width but not the height...?!

Friday, June 20, 2008

Automating Qt compilation with MSBuild scripts

Qt introduces some special mechanisms to introduce some kind of "reflection" and a similar concept to events/delegates in C#, called Signals and Slots in Qt. This is very useful indeed, but when developing under windows with Visual Studio, the compilation process becomes a bit cumbersome:

1a) create *.pro file, using 'qmake -project'
1b) derive a makefile from the *.pro, using 'qmake -makefile'
2) generate *.vcproj (to work in Visual Studio)
3) compile *.vcproj

This can be perfectly automated using MSBuild scripts (*.proj files). With MSBuild scripts you can do anything that you can do with *.bat files, and a whole lot more. They are typically used to automate compilation (and 'Continuous Integration') of .Net projects, but they can be perfectly abused for C++/Qt stuff too! :-)

Prequisites:
- Install .Net 2.0 SDK (it's needed for executing VCBuild tasks in MSBuild files)
- Append 'C:\Program Files\Microsoft Visual Studio 9.0\VC\vcpackages' to your Path Environment Variable.
- 'Qt-ready' environment

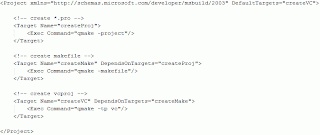
We put Steps 1a, 1b, and 2 in a 'compile_qt.proj' MSBuild script:


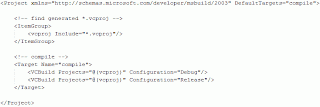
We put Step 3 in a separated 'compile_vc.proj' MSBuild script (it MUST be in a separated MSBuild script, because the vcproj files are recognized danymically with msbuilds 'ItemGroup' mechanism, which is always invoked at the startup of the script, hence only working in our case properly if we start this script AFTER steps 1 and 2):


It would be possible to call compile_vc.proj directly from within compile_qt.proj, but somehow I find it more convenient to have a spearate third 'compile.proj' that calls all other *.proj (many other custom build steps can be added later, and clearly separated in different *.proj files for easy maintenance):


Now the whole conversion/compilation process can be run with one single command:

C:\Windows\Microsoft.NET\Framework\v3.5\msbuild.exe compile.proj

I recommend to define C:\Windows\Microsoft.NET\Framework\v3.5\msbuild.exe as the default application to run *.proj files, then you only need to double-click compile.proj and that's it.

If run with the 'just clicking the *.proj', then if there is an error in the conversion/compilation process, the shell closes immediately after the error was displayed, making it impossible to investigate the problem. The simplest solution to that is to have a little 'compile.bat' file:

C:\Windows\Microsoft.NET\Framework\v3.5\msbuild.exe compile.proj @pause
...and to just click compile.bat instead of compile.proj when facing errors.

Important note: All *.proj and *.bat files in this article must be located in the root directory of your Qt project.

PS: Sorry for the pictures... ...can anybody tell me how to add ordinary 'code blocks' with the blogspot engine?!

Friday, June 13, 2008

Setting up Qt for Visual Studio 2008

This guide describes the compilation and configuration of Qt using Microsoft Visual C++ 9.0 Editions (Express, Standard or Professional editions will all work), using Microsoft's VC 9 compiler. These instructions are for Qt 4.4.0 but will most likely also work for newer versions.

Prerequisites:

  • Microsoft Visual C++ 9.0 (e.g. Express Edition), aka VS 2008 must be installed.

Qt compilation:

  1. Download the qt source from here: http://trolltech.com/developer/downloads/qt/windows
  2. Unzip the contents of the zip to (for example): 'c:\qt\4.4.0' (so 'configure.exe' is located in 'c:\qt\4.4.0').
  3. In order to avoid lots of compiler warnings, edit the file 'c:\qt\4.4.0\mkspecs\win32-msvc2008\qmake.conf' by removing '-w34100 -w34189' from the line 'QMAKE_CXXFLAGS_WARN_ON = $$QMAKE_CFLAGS_WARN_ON -w34100 -w34189'. (Warning 4100 indicates unused function parameters, which will happen all the time. Warning 4189 shows initialized but unused variables, which is common in the release build).
  4. Open Environment Variables (In Windows Vista: Control Panel, System and Maintenance, System, Advanced system Settings, Environment Variables).
  5. Add the 'System Variable' named 'QTDIR' and set its value to 'c:\qt\4.4.0'.
  6. If it doesn't exist yet, add a 'System Variable' named 'QMAKESPEC' and set its value to 'win32-msvc2008'.
  7. Append ';c:\qt\4.4.0\bin' to the 'Path' variable
  8. Run a console with the VS 2008 paths set. Do this by selecting 'Tools' - 'Visual Studio 2008 Command Prompt' in Visual Studio 2008.
  9. In the console, navigate to 'c:\qt\4.4.0' (type 'c:' followed by 'cd c:\qt\4.4.0')
  10. Type 'configure', enter 'y'
  11. Type 'nmake'

Visual Studio Integration (recommended)


  1. Add 'c:\qt\4.4.0\include' to the include paths in VS 2008
  2. Add 'c:\qt\4.4.0\lib' to the library paths in VS 2008 (not necessary when using nmake, but it helps IntelliSense finding the Qt header files)
  3. Create desktop shortcuts to 'bin\designer.exe' and 'bin\assistant.exe'
  4. Associate '.ui' files with 'bin\designer.exe'

Tuesday, November 6, 2007

11 Things Ubuntu Needs To Improve On

Matt Hartley has posted 10 Things Ubuntu Needs To Improve On. He seems to know quite well about what he is writing, although I did not experience problems with (wireless) networking.

What surprises me is that he does not mention display resolution. As I have written earlier, changing the display resolution in Ubuntu can be quite a hassle. There are two options available through the Menu of the Desktop, and both must be set correctly in order to get the right resolution also after a restart of X Window System (Trick: to restart the X Window System in Ubuntu, just press Ctrl+Alt+Backspace).
Searching for a solution on the web only leads to some forums where people write how to modify /etc/X11/xorg.conf manually, which is a total imposition for newbies coming from the Windows world (and in my case, it even did not lead to success anyways!). So, I would like to add point 11) to the list of Matt Hartley:

11) Dummy-proof way of changing the Display Resolution through the Desktop! It is the first thing any novice from the Windows world will want to do, hence it is absolutely essential! Imho, the Windows way of changing things that affect the Desktop (right-click on Desktop, then select 'Properties') is excellent and should be copied 1:1 unless there are some copyrights or patents against it.

Friday, November 2, 2007

Share a single mouse and keyboard between multiple computers with different operating systems, each with its own display, without special hardware

I am currently testing Linux on a separate PC besides my main PC (which still runs Windows). For each PC, I have a separate monitor on my desk. Both PCs are connected over Ethernet.

I was looking for a possibility to use just one keyboard and mouse for both systems, preferably without additional hardware. The perfect solution is called synergy! There is a common description about how to setup, or you can use the following quick-guide which is most useful for a Ubuntu/Windows mix.

Step 1a: Download and install the latest version of synergy on the Windows PC (manually).

Step 1b: Download and install the latest version of synergy on the Linux PC. You won't find synergy in the package managers that are accessible through the default desktop menu. The easiest way to install it is to open a terminal (shell) and to execute the following command: 'sudo apt-get install synergy', which will locate synergy on the internet, download and install it on your local machine. (Note: this might not work for all Linux distributions, but it perfectly does for Ubuntu). If it works, you should get someting like that in the console:

josua@camelot-linux:~$ sudo apt-get install synergy
[sudo] password for josua:
Reading package lists... Done
Building dependency tree
Reading state information... Done
The following NEW packages will be installed:
synergy
0 upgraded, 1 newly installed, 0 to remove and 11 not upgraded.
Need to get 628kB of archives.
After unpacking 1573kB of additional disk space will be used.
Get:1 http://ch.archive.ubuntu.com gutsy/universe synergy 1.3.1-2ubuntu2 [628kB]
Fetched 628kB in 2s (285kB/s)
Selecting previously deselected package synergy.
(Reading database ... 88932 files and directories currently installed.)
Unpacking synergy (from .../synergy_1.3.1-2ubuntu2_i386.deb) ...
Setting up synergy (1.3.1-2ubuntu2) ...

josua@camelot-linux:~$


Note: you don't necessarily need a Linux/Windows setup. You can as well just have 2 Windows PCs or 2 Linux PCs, or even Macs!

Step 2: Define one PC as Server, the other as Client. The PC that will be used more often should become the Server. For me, the Windows PC still has priority, so my Windows PC is the Server, the Linux PC is the Client.

Step 3: Configure the Server. The way synergy works is as follows: the monitor with the current mouse-cursor gets the the keyboard (and mouse) input. Therefore, we only need to define the physical setup of the monitors exactly as they are our (physical) desk. In windows, this is rather simple: Start Synergy, and in the GUI enable "share this computer's keyboard and mouse (server)", then click configure, add the screens (you MUST use your computer-names or IP as screen names!), and configure your setup (e.g. 'my-linux-screen is at the left of my-windows screen'...) with the options at the bottom of the dialog.
Configuring the server on a Linux PC means you have to edit the synergy.conf file in your home directory (just create it manually). The synergy homepage provides some useful examples.

Step 4: Let's autostart synergy on both systems on startup. In Windows, you can simply use the GUI again (just hit the AutoStart Button and configure). In Ubuntu Linux (using Gnome by default) we must add synergy to the sessions that are automatically started on login. This can be done through the top panel of the desktop: System/Preferences/Sessions. Click 'Add' and fill in the fields as follows: Name: synergy, Command: synergyc -f server-ip, Comment: start synergy.

That's it. Restart both your Server and Client and enjoy!

Oh and btw, synergy allows you to magically 'copy & paste' from one PC to the other! :-D

Tuesday, October 30, 2007

Hands on KDevelop, QT4, SDL

Got my hands on KDevelop, QT4 and SDL... ...well, just some Hello World stuff.

The good news: I was able to do what I wanted. Everything needed to make my own programs with a nice GUI (QT4), or even cross platform multimedia applications (using SDL) can be installed through the Synaptic Package Manager.

The bad news: One would assume that installing an environment for a C++ 'Hello World' application would be as simple as installing a development IDE (KDevelop), create a "new Hello World Project", compile and run. This isn't exactly the case. Everything went well until I tried to compile. Then I had to go through a painful process of installing additional packages related to the compiler, the automated creation of makefiles (e.g. what the heck is this AM_PROG_TOOL stuff?!), 'konsole', etc.!

Here is a list of steps and packages I have added:

1) Add KDevelop (just add KDevelop, all the other packages will be selected automatically):
cvs (1:1.12.13-8)
kdebase-bin (4:3.5.8-0ubuntu2)
kdelibs-data (4:3.5.8-0ubuntu3.1)
kdelibs4c2a (4:3.5.8-0ubuntu3.1)
kdevelop (4:3.5.0-0ubuntu2)
kdevelop-data (4:3.5.0-0ubuntu2)
libapr1 (1.2.7-8.2ubuntu1)
libaprutil1 (1.2.7+dfsg-2build1)
libarts1c2a (1.5.8-0ubuntu1)
libartsc0 (1.5.8-0ubuntu1)
libaudio2 (1.9-2)
libavahi-qt3-1 (0.6.20-2ubuntu3)
libcvsservice0 (4:3.5.8-0ubuntu1)
liblua50 (5.0.3-2build1)
liblualib50 (5.0.3-2build1)
libopenexr2c2a (1.2.2-4.3ubuntu2)
libpq5 (8.2.5-1.1)
libqt3-mt (3:3.3.8really3.3.7-0ubuntu11)
libsvn1 (1.4.4dfsg1-1ubuntu3)

2) Add the g++ compiler:
g++ (4:4.1.2-9ubuntu2)
g++-4.1 (4.1.2-16ubuntu2)
libstdc++6-4.1-dev (4.1.2-16ubuntu2)

3) Sort out problems related to the automated creation of makefiles (this step was quite cumbersome!):
build-essential (11.3ubuntu1)
dpkg-dev (1.14.5ubuntu16)
autoconf (2.61-4)
autoconf-doc (2.61-0ubuntu1)
automake (1:1.10+nogfdl-1)
automake1.10-doc (1.10-1)
autotools-dev (20070306.1)
m4 (1.4.10-0ubuntu2)
autobook (1.4.4-unofficial-4)
patch (2.5.9-4)
libtool (1.5.24-1ubuntu1)
libtool-doc (1.5.24-1ubuntu1)

4) konsole (yes, written with k!)
konsole (4:3.5.8-0ubuntu2)¨

5) QT Designer (Just add QTDesigner, the rest will be added automatically):
comerr-dev (2.1-1.40.2-1ubuntu1)
libaudio-dev (1.9-2)
libc6-dev (2.6.1-1ubuntu9)
libexpat1-dev (1.95.8-4ubuntu1)
libfontconfig1-dev (2.4.2-1.2ubuntu4)
libfreetype6-dev (2.3.5-1ubuntu4)
libgl1-mesa-dev (7.0.1-1ubuntu3)
libglib2.0-dev (2.14.1-1ubuntu1)
libglu1-mesa-dev (7.0.1-1ubuntu3)
libglu1-xorg-dev (1:7.2-5ubuntu13)
libice-dev (2:1.0.3-3)
libjpeg62-dev (6b-14)
libkadm55 (1.6.dfsg.1-7build1)
libkrb5-dev (1.6.dfsg.1-7build1)
liblcms1-dev (1.16-5ubuntu3)
libmng-dev (1.0.9-1)
libmysqlclient15off (5.0.45-1ubuntu3)
libpng12-dev (1.2.15~beta5-2ubuntu0.1)
libpq-dev (8.2.5-1.1)
libqt4-core (4.3.2-0ubuntu3)
libqt4-dev (4.3.2-0ubuntu3)
libqt4-gui (4.3.2-0ubuntu3)
libqt4-qt3support (4.3.2-0ubuntu3)
libqt4-sql (4.3.2-0ubuntu3)
libsm-dev (2:1.0.3-1)
libsqlite0 (2.8.17-2.1build1)
libsqlite0-dev (2.8.17-2.1build1)
libssl-dev (0.9.8e-5ubuntu3.1)
libx11-dev (2:1.1.1-1ubuntu4)
libxau-dev (1:1.0.3-2)
libxcursor-dev (1:1.1.8-2)
libxdmcp-dev (1:1.0.2-2)
libxext-dev (2:1.0.3-2build1)
libxfixes-dev (1:4.0.3-2)
libxft-dev (2.1.12-2ubuntu4)
libxi-dev (2:1.1.2-1)
libxinerama-dev (2:1.0.2-1build1)
libxmu-dev (2:1.0.3-1ubuntu1)
libxmu-headers (2:1.0.3-1ubuntu1)
libxrandr-dev (2:1.2.1-1)
libxrender-dev (1:0.9.2-1)
libxt-dev (1:1.0.5-3)
linux-libc-dev (2.6.22-14.46)
mesa-common-dev (7.0.1-1ubuntu3)
mysql-common (5.0.45-1ubuntu3)
qt4-designer (4.3.2-0ubuntu3)
x11proto-core-dev (7.0.10-2)
x11proto-fixes-dev (1:4.0-2ubuntu1)
x11proto-input-dev (1.4.2-1)
x11proto-kb-dev (1.0.3-2ubuntu1)
x11proto-randr-dev (1.2.1-2)
x11proto-render-dev (2:0.9.2-4ubuntu1)
x11proto-xext-dev (7.0.2-5ubuntu1)
x11proto-xinerama-dev (1.1.2-4ubuntu1)
xlibmesa-gl-dev (1:7.2-5ubuntu13)
xtrans-dev (1.0.3-2)
zlib1g-dev (1:1.2.3.3.dfsg-5ubuntu2)

6) SDL:
libflac-dev (1.1.4-3ubuntu1)
libmikmod2 (3.1.11-a-6ubuntu3)
libmikmod2-dev (3.1.11-a-6ubuntu3)
libogg-dev (1.1.3-2ubuntu2)
libsdl-console (1.3-4)
libsdl-console-dev (1.3-4)
libsdl-gfx1.2-4 (2.0.13-3)
libsdl-gfx1.2-dev (2.0.13-3)
libsdl-image1.2 (1.2.5-3)
libsdl-image1.2-dev (1.2.5-3)
libsdl-mixer1.2 (1.2.6-3)
libsdl-mixer1.2-dev (1.2.6-3)
libsdl-net1.2 (1.2.5-7)
libsdl-net1.2-dev (1.2.5-7)
libsdl-sge (030809dfsg-1ubuntu1)
libsdl-sge-dev (030809dfsg-1ubuntu1)
libsdl-sound1.2 (1.0.1-12build2)
libsdl-sound1.2-dev (1.0.1-12build2)
libsdl-stretch-0-2 (0.2.3-7)
libsdl-stretch-dev (0.2.3-7)
libsdl-ttf2.0-0 (2.0.9-1)
libsdl-ttf2.0-dev (2.0.9-1)
libsdl1.2-dev (1.2.11-9ubuntu2)
libsmpeg-dev (0.4.5+cvs20030824-2)
libsmpeg0 (0.4.5+cvs20030824-2)
libspeex-dev (1.1.12-3)
libtiff4-dev (3.8.2-7ubuntu2)
libtiffxx0c2 (3.8.2-7ubuntu2)
libvorbis-dev (1.2.0.dfsg-1)

So, with this packages, I am now really able to easily create 'Hello World' programs for both QT4 and SDL.

I don't know exactly what I should think now. On one hand, I am happy that I was able to sort out the problems myself (well, with the help of Google). On the other hand, compared to VisualStudio this was a rather cumbersome and geeky start. I wonder if there are some super-developer-packages that can be selected by a novice, and it will just select all sub-packages automatically to make sure that the first impression will be truly painless?

Generally, not being afraid of facing whatever unexpected problem occurs and sort it all out step by step is definitely something essential in the Linux World. I don't really have a problem with that, except that it eats up so much precious time, and even after having sorted out all the problems the overall feeling of being stupid and not having understood everything in full detail remains...
Sunday, October 28, 2007

Ubuntu Display Resolution

The first thing I had to resolve manually was that Ubuntu come up with a resolution of 1280x768 on my LCD Monitor with 1280x1024 (which looked horrible).
First I thought the problem might be related to my display adapter/driver (ATI Radeon 9800 PRO), so after some research I tried to update my driver with some heroic shell stunts, e.g.:

sudo arp-get install xorg-driver-fglrx

Although this command was a good exercise and forced me to learn about sudo and arp-get, and even magically downloads some driver stuff and installs it, the result was that I lost the hardware accelerated 3D desktop. And I was not able to switch back again to the original driver or the original settings - As a true dummy user, I ended up reinstalling the whole beast to get the hardware accelerated 3D back..!

Next thing I played with was the tool found in the menu:
System/Administration/Screens and Graphics.
There I changed the settings of Screen1 to "LCD Panel 1280x1024" and "Resolution=1280x1024". This already did half the job, but after a restart of the system, the desktop was again at 1280x1024. After a while I found that changing the resolution to 1280x1024 in the Menu
System/Preferences/Screen Resolution
is necessary too.

So, my recipe for changing the screen resolution is:
1) DON'T change the display driver as long as hardware accelerated 3D is working
2) Change settings of "Screens and Graphics"
3) Change settings of "Screen Resolution"
4) Make sure that the settings remain with a full restart of the PC

Note: Afaik, this settings basically just change /etc/X11/xorg.conf